Relief carving: reading depth on a shallow panel
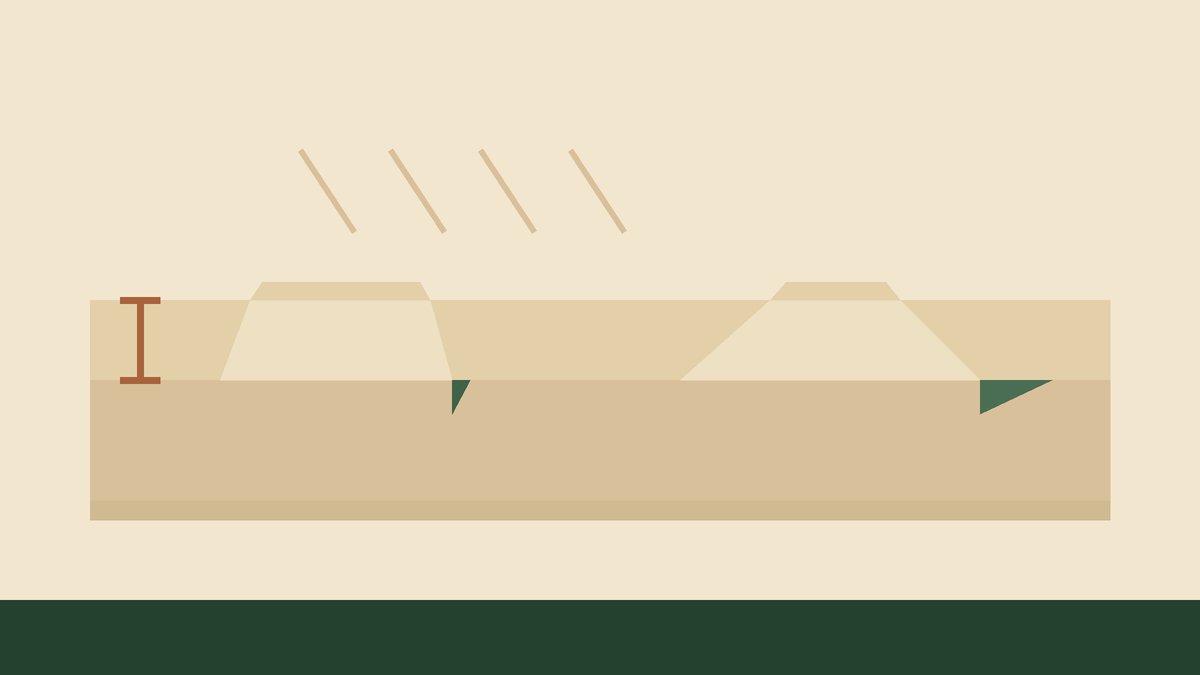
Beginners approach relief carving as excavation and spend an afternoon lowering a background by fifteen millimetres, then wonder why the result still looks flat. Depth is not what makes relief read. Shadow is, and shadow comes from the angle at the edge of a shape, not from how far down the ground sits.
The three levels
Any relief panel has exactly three surfaces to think about, and confusion between them is the usual reason a carving stalls.
- The ground: the lowered background, ideally flat and at one consistent depth throughout.
- The wall: the near-vertical face between the ground and the shape above it. This is where the shadow is made.
- The modelled surface: the top of the shape itself, rounded and shaped so that it does not read as a flat sticker sitting on the panel.
Most weak relief carvings have a good ground and a good outline but no modelling at all, so every shape reads as a cut-out rather than a form.
Setting in the outline
Transfer the design, then set in the outline with vertical stop cuts around every shape, two or three millimetres deep to start. Use a gouge whose sweep matches each curve rather than trying to follow curves with a straight chisel, which leaves faceted outlines that show once the ground is cleared.
Lean the tool very slightly away from the shape, never into it. A wall that leans inward undercuts the form and leaves it looking undermined once light hits it from above.
Clearing the ground
Work the ground down in stages, alternating between stop cuts and clearing passes, rather than trying to reach final depth in one go. Six millimetres is plenty for a decorative panel; eight is generous. Deeper grounds take much longer and add almost nothing visually.
Keep the ground flat. A wandering ground catches light unevenly and pulls the eye away from the design, which is why old panels often have a texture punched into the background — it disguises small irregularities and, more usefully, it makes the smooth modelled surfaces above look smoother by contrast.
Where the shadow comes from
A wall at ninety degrees to the ground throws a hard, narrow shadow. A wall sloped at sixty degrees throws a soft, wide one.
Vary the wall angle deliberately: steep where you want a shape to sit forward and read sharply, sloped where it should recede into the panel.
Modelling the surface
This is the stage that separates a carved panel from a routed one, and it is the one most often skipped. Round every shape over toward its edges so that the top surface curves down to meet the wall. Even half a millimetre of rounding changes how a form catches light along its whole length.
Work with a shallow gouge held bevel down, taking wide flat shavings. Check progress by holding the panel at the angle it will hang and looking at it from across the room. Modelling is judged at viewing distance, and details that look bold in the hand often disappear entirely at two metres.
The order, in one line
Transfer, set in, clear the ground, deepen the set-in, clear again, then model. Working around the whole panel at each stage rather than finishing one corner completely keeps the depths consistent and lets you change your mind while it still costs nothing.